


- 2009.10.31 Example ProgressDialog with a second thread / Double-J
- 2009.09.10 JNI 활용한 "Hello World" / Double-J
- 2009.01.10 객체지향(Object Oriented)에 대한 간단한 고찰.. / Double-J
- 2008.11.01 [JAVA] AWT - java.awt.Checkbox / Double-J
- 2008.11.01 [JAVA] AWT - java.awt.Button / Double-J
- 2008.08.20 [JAVA] Generic.... / Double-J
- 2008.07.24 [JAVA] Eclipse 사용시 메모리 사용량이 많아질때..(KeepResident Eclipse plugin) 2 / Double-J
Double-J's World » Search » Results » Articles
java와 관련된 글 7개
Double-J's World » Programming/Android
Example ProgressDialog with a second thread
Double-J | 2009. 10. 31. 11:19
진행 상태를 추적하기 위해 두 번재 thread 를 사용한다.
그 thread 는 진행이 이루어질 때마다 핸들러를 통해서 main activity 에게 message 를 보낸다.
메시지를 받은 activity 는 Progress Dialog 를 update 한다.
그 thread 는 진행이 이루어질 때마다 핸들러를 통해서 main activity 에게 message 를 보낸다.
메시지를 받은 activity 는 Progress Dialog 를 update 한다.
package com.example.progressdialog;

import android.app.Activity;
import android.app.Dialog;
import android.app.ProgressDialog;
import android.os.Bundle;
import android.os.Handler;
import android.os.Message;
import android.view.View;
import android.view.View.OnClickListener;
import android.widget.Button;

public class NotificationTest extends Activity {
    static final int PROGRESS_DIALOG = 0;
    Button button;
    ProgressThread progressThread;
    ProgressDialog progressDialog;

    /** Called when the activity is first created. */
    public void onCreate(Bundle savedInstanceState) {
        super.onCreate(savedInstanceState);
        setContentView(R.layout.main);

        // Setup the button that starts the progress dialog
        button = (Button) findViewById(R.id.progressDialog);
        button.setOnClickListener(new OnClickListener(){
            public void onClick(View v) {
                showDialog(PROGRESS_DIALOG);
            }
        });
    }

    protected Dialog onCreateDialog(int id) {
        switch(id) {
        case PROGRESS_DIALOG:
            progressDialog = new ProgressDialog(NotificationTest.this);
            progressDialog.setProgressStyle(ProgressDialog.STYLE_HORIZONTAL);
            progressDialog.setMessage("Loading...");
            progressThread = new ProgressThread(handler);
            progressThread.start();
            return progressDialog;
        default:
            return null;
        }
    }

    // Define the Handler that receives messages from the thread and update the progress
    final Handler handler = new Handler() {
        public void handleMessage(Message msg) {
            int total = msg.getData().getInt("total");
            progressDialog.setProgress(total);
            if (total >= 100){
                dismissDialog(PROGRESS_DIALOG);
                progressThread.setState(ProgressThread.STATE_DONE);
            }
        }
    };

    /** Nested class that performs progress calculations (counting) */
    private class ProgressThread extends Thread {
        Handler mHandler;
        final static int STATE_DONE = 0;
        final static int STATE_RUNNING = 1;
        int mState;
        int total;

        ProgressThread(Handler h) {
            mHandler = h;
        }

        public void run() {
            mState = STATE_RUNNING;
            total = 0;
            while (mState == STATE_RUNNING) {
                try {
                    Thread.sleep(100);
                } catch (InterruptedException e) {
                    Log.e("ERROR", "Thread Interrupted");
                }
                Message msg = mHandler.obtainMessage();
                Bundle b = new Bundle();
                b.putInt("total", total);
                msg.setData(b);
                mHandler.sendMessage(msg);
                total++;
            }
        }

        /* sets the current state for the thread,
         * used to stop the thread */
        public void setState(int state) {
            mState = state;
        }
    }
}
출처 : http://developer.android.com/guide/topics/ui/dialogs.html

Double-J's World » Programming/JAVA
JNI 활용한 "Hello World"
Double-J | 2009. 9. 10. 15:59
![]() Main Code 작성
Main Code 작성
패키지명 : jnitest
파일명 : JNITest
JNITest.java
package jnitest;
public class JNITest {
static{
System.loadLibrary("NativeHello");
}
public static void main(String[] args) {
NativeHello obj = new NativeHello();
obj.sayHello();
}
}
public class JNITest {
static{
System.loadLibrary("NativeHello");
}
public static void main(String[] args) {
NativeHello obj = new NativeHello();
obj.sayHello();
}
}
![]() 호출할 함수 원형 작성
호출할 함수 원형 작성
패키지명 : jnitest
파일명 : NativeHello
NativeHello.java
package jnitest;
public class NativeHello {
public native void sayHello();
}
위의 두 소스가 작성되었다면 메뉴에서 Run -> Build (혹은 Clean & Build) 실행.
제대로 빌드가 되었다면 "build/classes" 란 폴더 아래 패키지명과 동일한 폴더와 *.class 파일이 생성됨을 볼 수 있다. (아래의 캡쳐화면 참고)
![]() javah 로 c/c++ 형태의 헤더파일 생성하기
javah 로 c/c++ 형태의 헤더파일 생성하기
콘솔창에서 해당 프로젝트의 classes 폴더까지 이동 한후
javah -jni packagename.classname
위와 같은 명령어를 실행한다. 실행하면 *.h 파일이 생성된다. (아래 화면 참고)
![]() DLL 파일 생성
DLL 파일 생성
Visual Studio 을 통해 MFC DLL 프로젝트를 생성 후 "Solution Explorer" 에서 프로젝트명을 마우스 우클릭하여 (VS2008 기준)
Properties 에서 다음과같이 %JAVA_HOME%\include 와 %JAVA_HOME%\include\include\win32 폴더를 추가한다.
include directory 작업을 완료한 후 좀전 작업에서 생성되었던 헤더파일의 내용을 생성된 프로젝트의 헤더파일에COPY-PASTE 를 한다. (파일 자체를 복사해도 큰 문제는 없는듯..) 기존의 내용은 가급적 주석처리.
프로젝트내의 헤더파일명과 동일한 *.cpp 파일에서 기본으로 생성된 필요 없는 내용은 주석처리를 한 후 헤더파일에 작성되어있는 함수를 실제로 구현해준다. (다음 그림참고)
작성후 빌드 하면 *.dll 파일이 생성된다. 이 파일을 JAVA프로젝트에 복사한다. (다음 화면 참고)
이제 Run 을 하면 실제 동작화면을 볼 수 있다.
이 글은 스프링노트에서 작성되었습니다.
Double-J's World » Programming/JAVA
객체지향(Object Oriented)에 대한 간단한 고찰..
Double-J | 2009. 1. 10. 02:14
갑자기 책꽂이에 있던 책들을 훑어보다가 누구나(?)다 알고있을법한 객체지향에 대한 얘기를 간단한 개그(?)와 접목시켜서 설명한 내용이 있어서 포스팅 해볼까 합니다.
C/C++ 로 배우는 자료구조론(한빛미디어) 의 객체 지향 방법론 부분을 보면 코끼리를 냉장고에 넣는 객체 지향적 방법중 하나로 "조교에게 시킨다" 라고 나옵니다. 참 단순하면서도 잘 맞아떨어지는 말이라 할 수 있지요.
객체(Object)는 현실세계의 어떤 형태든 프로그래밍 방법론 적으로 표현한 대상이라고 볼 수 있습니다. 그리고 실제 프로그래밍에선 그 객체는 고유한 '속성'과 더불어 '동작 혹은 기능(속성을 마음대로 바꿀 수있는..)' 이라는 것을 가지고 있습니다.
현실 세계의 물체를 예를 들어보겠습니다. 아주 간단하게 라디오를 생각해보면(아주 단순한 라디오청취기능만 있다고 가정...) 라디오 자체가 가지고 있는 속성(특징)은
정도가 있을 겁니다. 그리고 이러한 속성(특징)을 제어하는 동작 혹은 기능은
정도로 생각 해볼수 있겠죠.
바로 이것이 코딩시 그대로 적용되는 부분들입니다.
Java를 예를 들어보면 클래스의 field부분엔 바로 변수 형태로 위에서 말한 속성(소리, 주파수)들이 적용되고 method는 위에서 말한 제어하는 기능 들을 구현해주게 됩니다. 이 두가지 가 합쳐서 하나의 클래스를 이루는 것입니다.
더불어 이러한 클래스를 메모리상에서 실체화 시켜서 동작하게끔 해주면 마치 객체 자체가 알아서 모든 것을 다 해주는 것 처럼 할 수 있죠.
이처럼 문제해결을 할때 객체위주로 묶어가며 해답을 찾는 방법론이 바로 객체 지향 (Object Oritented)라고 말할 수 있습니다.
C/C++ 로 배우는 자료구조론(한빛미디어) 의 객체 지향 방법론 부분을 보면 코끼리를 냉장고에 넣는 객체 지향적 방법중 하나로 "조교에게 시킨다" 라고 나옵니다. 참 단순하면서도 잘 맞아떨어지는 말이라 할 수 있지요.
객체(Object)는 현실세계의 어떤 형태든 프로그래밍 방법론 적으로 표현한 대상이라고 볼 수 있습니다. 그리고 실제 프로그래밍에선 그 객체는 고유한 '속성'과 더불어 '동작 혹은 기능(속성을 마음대로 바꿀 수있는..)' 이라는 것을 가지고 있습니다.
현실 세계의 물체를 예를 들어보겠습니다. 아주 간단하게 라디오를 생각해보면(아주 단순한 라디오청취기능만 있다고 가정...) 라디오 자체가 가지고 있는 속성(특징)은
- 소리
- 주파수
정도가 있을 겁니다. 그리고 이러한 속성(특징)을 제어하는 동작 혹은 기능은
- 소리를 크게하는(volume up) 기능
- 소리를 작게하는(volume down)기능
- 주파수 내리기
- 주파수 올리기
정도로 생각 해볼수 있겠죠.
바로 이것이 코딩시 그대로 적용되는 부분들입니다.
Java를 예를 들어보면 클래스의 field부분엔 바로 변수 형태로 위에서 말한 속성(소리, 주파수)들이 적용되고 method는 위에서 말한 제어하는 기능 들을 구현해주게 됩니다. 이 두가지 가 합쳐서 하나의 클래스를 이루는 것입니다.
더불어 이러한 클래스를 메모리상에서 실체화 시켜서 동작하게끔 해주면 마치 객체 자체가 알아서 모든 것을 다 해주는 것 처럼 할 수 있죠.
이처럼 문제해결을 할때 객체위주로 묶어가며 해답을 찾는 방법론이 바로 객체 지향 (Object Oritented)라고 말할 수 있습니다.
Double-J's World » Programming/JAVA
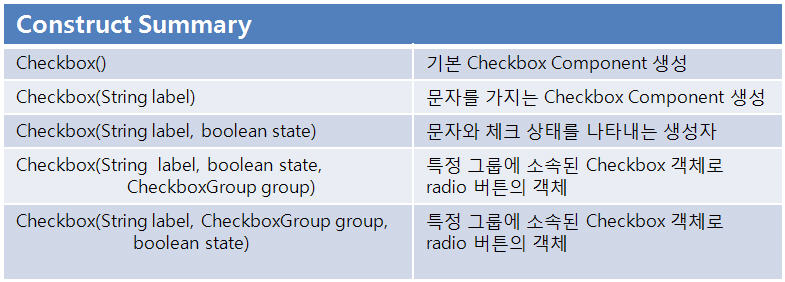
[JAVA] AWT - java.awt.Checkbox
Double-J | 2008. 11. 1. 22:24

Double-J's World » Programming/JAVA
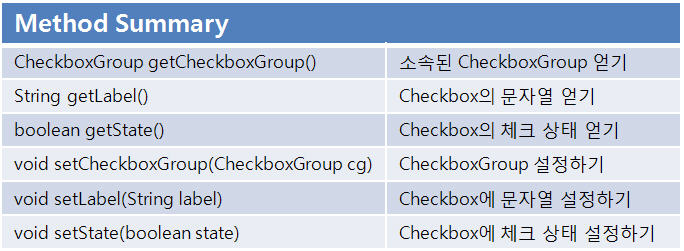
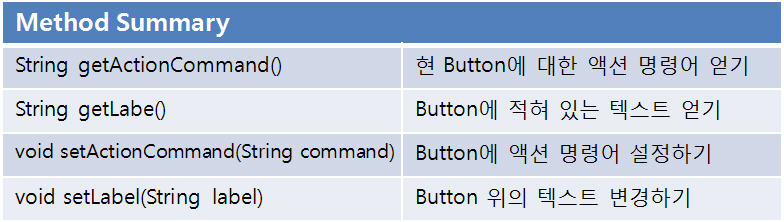
[JAVA] AWT - java.awt.Button
Double-J | 2008. 11. 1. 15:42

- Construct

- Method
// Button example
import java.awt.Button;
import java.awt.Dimension;
import java.awt.Frame;
import java.awt.GridLayout;
import java.awt.Toolkit;
import java.awt.event.WindowAdapter;
import java.awt.event.WindowEvent;
class ButtonEx_Sub extends Frame{
private GridLayout gl = new GridLayout(4, 3,5, 5);
private Button [] bt = new Button[12];
public ButtonEx_Sub() {
super("ButtonEx");
init();
this.setSize(500, 300);
Dimension screen = Toolkit.getDefaultToolkit().getScreenSize();
Dimension frame = this.getSize();
int xpos = (int)(screen.getWidth()/2 - frame.getWidth()/2);
int ypos = (int)(screen.getHeight()/2 - frame.getHeight()/2);
this.setLocation(xpos, ypos);
this.setVisible(true);
//window closing..
addWindowListener(new WindowAdapter(){
public void windowClosing(WindowEvent e){
dispose();
System.exit(0);
}
});
}
public void init() {
String [] str = {"*", "0", "#"};
this.setLayout(gl);
for(int i=0; i<12; i++) {
if(i<9) {
bt[i] = new Button(""+(i+1));
}
else {
bt[i] = new Button(str[i-9]);
}
this.add(bt[i]);
}
}
}
public class ButtonEx {
public static void main(String[] args) {
ButtonEx_Sub ex = new ButtonEx_Sub();
}
}
Double-J's World » Programming/JAVA
[JAVA] Generic....
Double-J | 2008. 8. 20. 09:38
Generic Class :
Collection Class에서 사용되는 JDK 5.0 에서 새롭게 나온 개념.
하나의 Class가 알고리즘을 적용 받을 수 잇는 원소의 자료형을 다양하게 하기 위해서 사용
Generic Class는 로직만 구현하고 원소들의 자료형태에 대해서는 언급하지 않음.
단, 객체 생성할 때에는 자료형 언급해야 함
Generic 에 대해 잘 정리되어 있는 블로그 -> 링크
Collection Class에서 사용되는 JDK 5.0 에서 새롭게 나온 개념.
하나의 Class가 알고리즘을 적용 받을 수 잇는 원소의 자료형을 다양하게 하기 위해서 사용
Generic Class는 로직만 구현하고 원소들의 자료형태에 대해서는 언급하지 않음.
단, 객체 생성할 때에는 자료형 언급해야 함
Generic 에 대해 잘 정리되어 있는 블로그 -> 링크
Double-J's World » Programming/JAVA
[JAVA] Eclipse 사용시 메모리 사용량이 많아질때..(KeepResident Eclipse plugin)
Double-J | 2008. 7. 24. 12:10
이클립스 사용하면 메모리 사용량이 꽤 많다.
사양이 낮은 컴퓨터에서 사용하다보면 눈에 띄는데
가상메모리 사용량을 줄여주는 플러그인이 있다.
KeepResident 라는 플러그인 인데 우연치 않게 검색하다가 찾게되었다.
플러그인을 다운 받아서 이클립스 plugin폴더에 추가시켜주고
이클립스를 실행시키면
Window -> Preferences.. 메뉴에 다음과 같은 옵션이 추가된다.
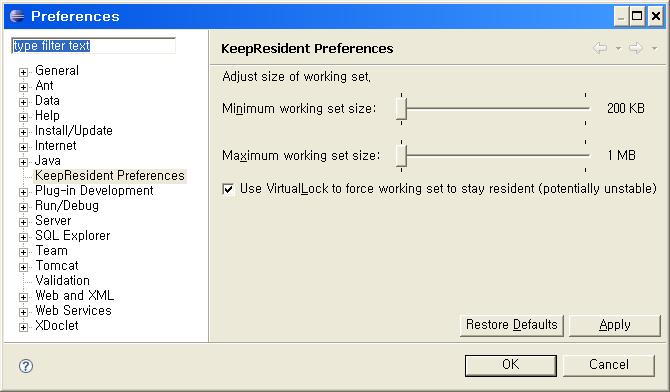
여기서 설정하고 Apply 후 실행!!
정식으로 다운받을 수 있는곳 : http://suif.stanford.edu/pub/keepresident/
처음으로 자료를 찾은 블로그 : http://blog.naver.com/pdauser/18240997
자세한 설명이 있는 블로그 : http://yunho.egloos.com/918033/


 RSS 2.0
 Tattertools
 Skin by ZF.